VW ID.4 backup camera hood

£31.99

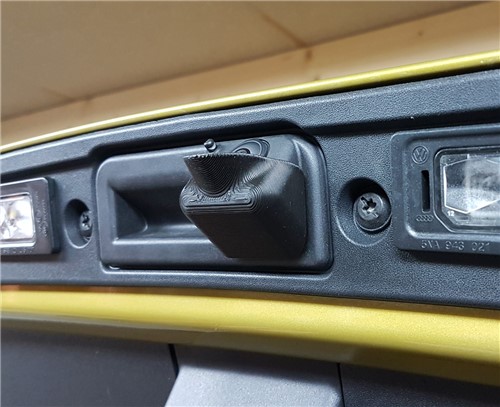
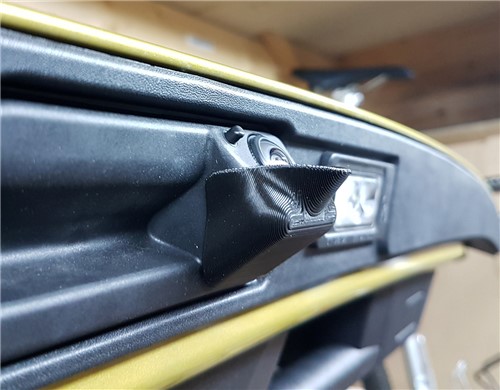
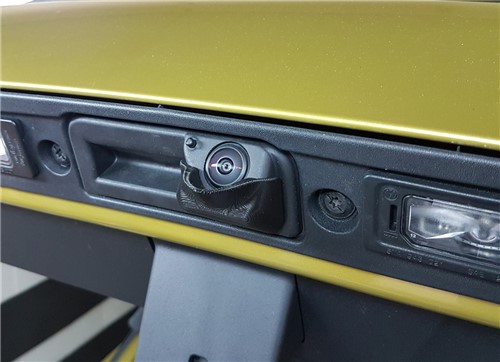
The backup camera on the VW ID.4 is located just above the license plate, and being a fisheye camera, the field of view is wide enough that it includes parts of the license plate in the picture.

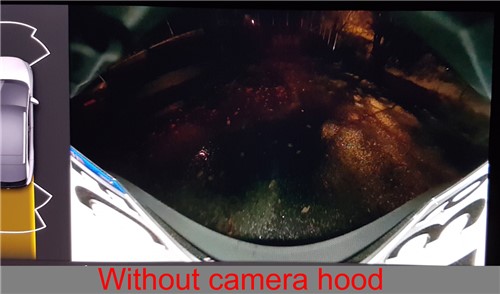
During daytime this is not a problem, but in dim or dark environments, the license plate will be very bright due to the above lights shining on it, which in turn will cause the camera to lower the brightness to avoid blowing out the picture in those areas. However, this will also cause the rest of the image to become significantly darker, which is not desirable.

This custom designed hood will remedy this problem by blocking the camera view of the license plate, resulting in a much brighter picture in dim and dark environments (pictures shows this quite well).

To mount on the car, you will need a piece of strong, double-sided mounting tape. Put the tape on the inside flat part of the hood, and press it firmly onto the camera, making sure to push it all the way up against the front face (with the lens), before pressing it up to fix it in place. It is advisable to test fit the hood without the tape first, to check that it seats properly. It should be a fairly snug fit, but you should not need to use excessive force.

SKU: f054efe85fa2 Category:

Description

The backup camera on the VW ID.4 is located just above the license plate, and being a fisheye camera, the field of view is wide enough that it includes parts of the license plate in the picture.

During daytime this is not a problem, but in dim or dark environments, the license plate will be very bright due to the above lights shining on it, which in turn will cause the camera to lower the brightness to avoid blowing out the picture in those areas. However, this will also cause the rest of the image to become significantly darker, which is not desirable.

This custom designed hood will remedy this problem by blocking the camera view of the license plate, resulting in a much brighter picture in dim and dark environments (pictures shows this quite well).

To mount on the car, you will need a piece of strong, double-sided mounting tape. Put the tape on the inside flat part of the hood, and press it firmly onto the camera, making sure to push it all the way up against the front face (with the lens), before pressing it up to fix it in place. It is advisable to test fit the hood without the tape first, to check that it seats properly. It should be a fairly snug fit, but you should not need to use excessive force.
3D printing settings

When printed on FDM, a layer height of 0.2 mm (or less) is recommended.

The file should import in your slicer in the recommended printing orientation, but it is possible to print in other orientations as well. If printing with the big flat bottom face towards the bed, supports might be necessary under the protruding hood part.

The files that have "ears" in the name comes with additional bed adhesion features, which will need to be cut off after printing with a sharp blade (or x-acto) knife. If you are printing in a different orientation or don't need the extra bed adhesion, choose a file without the ears.

The design comes with different depth insets/pockets for the double sided tape, so choose one which suits the tape you have. For example, if your tape is 0.8 mm thick, then print the file with the 0.6 mm inset to leave some space for the tape to adhere to the camera bump on the car.

If printed in the recommended orientation, no supports should be necessary, but due to the overhangs on the inside where the hood meets the body, you might have to do some minor cleanup with a sharp knife.