Description
# Mars orbiter
# Key Point
– ender3, ender3pro, ender3v2, CR10
– does not reduce printing surface area!
– no print support!
– Can be used with or without a direct drive system (aka bowden setup)
– orbiter extruder, sherpa mini, microswiss direct drive (may need tweaking), some self printed ones that attaches on the wheel axles
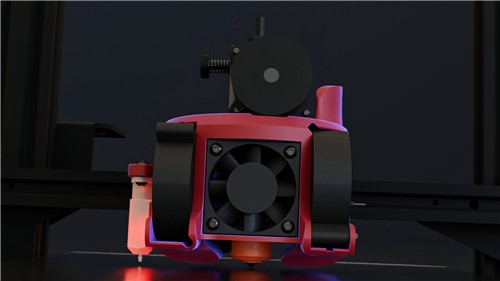
– dual 5015 blower
– hotend fan can be 40×20 or 40×10 ( 10mm spacer included in files )
– BLtouch and CRtouch compatible.
– 12mm & 18mm probes (like EZABL)
– swappable probes version
– stock hotend, dragon (rigid mounted), dragonfly BMS/BMO (rigid mounted), microswiss Direct drive. Slice Engineering copperhead (unconfirmed), Phaetus Rapid HF (unconfirmed),
– printable filament sensor reusing Z axis end stop, advantage over most other design is that filament can be fed from either direction, not something needed often, but could happen. And a mount for the orbiter extruder, or a standalone one that sandwiches a pneumatic fitting.
—
**Make sure to set the correct BLtouch offset and mesh min/max to avoid crashing your print head** (values are further below)
## Key point:
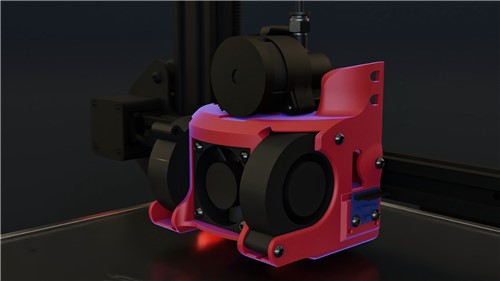
– rigid mounting (two part print that interlock and screwed to each other, as well as individually secured to the gantry mounting plate, even more rigid on ender3v2)
– Dual 5015s
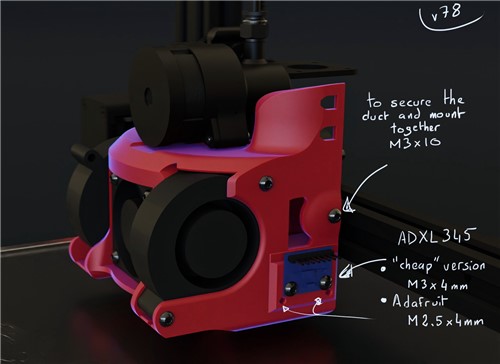
– adxl345 mount (accelerometer) both cheap and Adafruit version supported on latest models (bltouch on the left)
– cable management hidden routes (large enough to fit a small two pin fan connector, and 3 pin for the hotend fan like noctua 4020)
– bltouch/crtouch mount ( has been moved to the left side later on, for larger meshable area )
– Direct drive compatibility:
– orbiter extruder (if using with Phaet dragon bowden tube should be 39mm, but double check, won’t affect print quality but may make loading filament harder )
– Microswiss Direct drive (in process, just needs a few tweaks)
– Anything that attaches on the back of the X gantry plate, top of the duct is flush with the X gantry plate (except the obvio cable management side wall, if you want a version without it, can remove it)
– Sherpa mini could be made compatible, let know if you want it
– Printer compatibility:
– ender 3/pro
– ender 3v2
– CR10 ( understand it has the same X mounting plate as the ender3)
– any printer with 20x20mm aluminum extrusion on the X axis and similar belt system as the ender3, you can buy an ender3 X gantry plate ( know triangle labs on Ali has one)
– Hotend compatibility
– stock ender hotend
– Dragon (rigid mount included here)
– DragonFly BMS
– DragonFly BMO rigid mount
– Dragonfly BMO and other V6 mount (No volcano sorry)
– hotend from Microswiss Direct drive
– slice engenering copperhead (untested but fits in CAD)
## Two part print, one for the duct and one for the hotend mount (not technically a mount, but it is in some cases like the dragon or dragonfly)
Duct comes in different variation depending on your setup and printer (ender3v2 is the most universal version)
– file names should be self explanatory
– One with Orbiter mount holes (can be used with bowden setup)
– One without Orbiter mount holes (meant for dedicated bowden setup, of if you have another direct drive system that is compatible)
– one for microswiss Direct drive (should work with V-rollers and linear rails)
As for the mount, if you have a hotend not listed and want this duct, let know, and can figure it out
– file names should be self explanatory
– for dragonfly BMS the stock mount can also be used with your own washers, otherwise this has a printed spacer for it
## Screws:
– two (3/pro) or three (3v2) M3x6 for any screws that go into the X gantry, m3x8 should work too, they’ll just stick out the back, but should not interfere with anything.
– ender3v2 only, optional screw one m3x5 or m3x6 that screws from the back of the plate (preferably only loosen the bottom and top left wheel to remove/install the gantry) this will add extra rigidity
– one m3x8 (m3x10 will work too) to connect the two printed bart together (located on the right wall)
– three M4x20 for the 5015 fans
– four M3x30 for the 4020 fans (or 4010 with spacer)
– Orbiter extruder: two M3x10mm and two m3 nuts.
– bltouch m3x6, or to use nuts to strengthen it, your screws will need to be m3x8mm up to m3x10
Dragonfly screws:
– two M3x6 to mount to the plate
– four M2.5×6 to go into the dragonfly
– two M3 between 8mm and 12mm long to secure the two parts together
# ORDER OF INSTALL
– make sure your bed is clean and has good adhesion, there are thin parts for the first 30 layers or so
– print everything (and a backup of the mount, just for worse case scenario if you experience bad heat creep)
– cut the horizontal helper print line, right side of the duct in the back, connecting the duct and the vertical wall next top the hotend (see pictures)
– test fit the two printed part (tolerance are low, but if the print is clean they should fit perfectly, and if it needs a little force but still fits that’s better for extra rigidity), clean up if needed
– install the small printed part on the gantry, one screw (m3x6 or m3x8) on the top left, if your gantry mounting plate has a bad screw thread (like mine), you can screw it from the back
– if you have a dragon hotend, or want to strengthen the duct to your ender3v2, loosen the top left and bottom wheel, that should be enough to derail it and access lower right screw (that hole in the gantry is just as simple bore, no thread there, that’s why you need to screw it form the back), once done re-rail your gantry, remember to fix the eccentric nut too.
– install your hotend
– prepare the screws on the duct by screwing them in a tiny bit (one inside, behind the left fan, one on the right wall next to the adxl mount, and one on the outside left side for the ender3v2)
– you can prewire the fan and mount them to the duct, except the left fan since there is a screw behind it (there are multiple passages just use what is easiest)
– same with the bltouch/crtouch, there cable management for it, you can wire and screw the bltouch in before installing the duct (m3 nuts are optional)
– mount the duct, install the screw behind the left fan (m3x6 or m3x8), and the right wall, on the ender3v2 there’s another screw on the left side to strengthen it all.
– finish mounting the left fan
– Orbiter extruder, two m3 nuts and secure with M3x10mm. 39mm bowden tube between the orbiter and the Phaet dragon hotend there is 11mm between the roof of the duct and the inside of the orbiter extruder.
– enjoy
—
If some of your values are wrong get ready to kill printer power before a nozzle crash
# BLTOUCH – LEFT SIDE – settings (X is exact, Y are approximations)
– stock hotend: offset X is -52.7mm , Y is -15.5mm
– Dragon Fly BMS: offset X is -52.7mm , Y aprox -14
– dragon: offset X is -52.7mm, Y is -7.5 mm
physical printer max X to 247
physical printer max Y to 229
(starting values to be safe, adjust them more precisely to your printer, depending on your hotend )
In klipper those are the actually bltouch head coordinates.
mesh min = 20, 20
Mesh max = 184 , 203
# BLTOUCH – RIGHT SIDE (old version) (X is exact, Y are approximations)
– stock hotend: offset X is +52.7mm , Y is -8mm
– Dragon Fly BMS: offset X is +52.7mm , Y should be around -6.8mm to -7.0mm
– dragon: offset X is +52.7mm, Y is 0mm
In klipper those are the actually bltouch head coordinates.
mesh_min: 54, 20
mesh_max: 220, 210
#PROBE 12 & 18mm
(Y offset are approximate, X is exact)
18mm:
Offset X= -55.40mm
Offset Y= -15.5 mm for stock (-23.5 for dragon/dragonflyBMO/v6)
12mm:
Offset X= -52.40mm
Offset Y= -12 mm for stock (-20 for dragon/dragonflyBMO/v6)
—
# weight breakdown:
totally setup weight: 360g ( includes duct, dragon hotend, orbiter extruder, fans, bltouch, adxl435, hotend, screws & bolts
(same weight as the official Creality direct drive, which has a single 4010 blower fan)
Duct: 87g
back mount: 4g
5015 Fan: 25g (X2)
Noctua 4020: 20g
bltouch:7g
Adxl: 2g
Dragon hotend: aprox 30g
Orbiter extruder: 145g
screws and bolts (include bltouch and adxl hardware): 13g

